ClickUp Setup for Bloggers
I have many tools that I rely on to help manage all of my blogs. One of those tools is ClickUp. I realize, though, that not every blogger has multiple blogs. Most bloggers start with just one. And the majority of bloggers will never have more than one blog. That’s the norm. This tutorial covers how I would setup ClickUp to work for ONE blog.
It also assumes you are the only one working on your blog but, the great thing about ClickUp is that you can easily expand to working with a team whenever needed.
Getting ClickUp
First things first, if you haven’t done so already you’ll want to signup for a FREE ClickUp account.
That’s all you will need to get started and don’t worry. Everything I do here can be done in the free version.
ClickUp Hierarchy
The first thing we need to do is look at the ClickUp Hierarchy.
Within ClickUp you can have Spaces, Folders, and Lists. It looks like this:
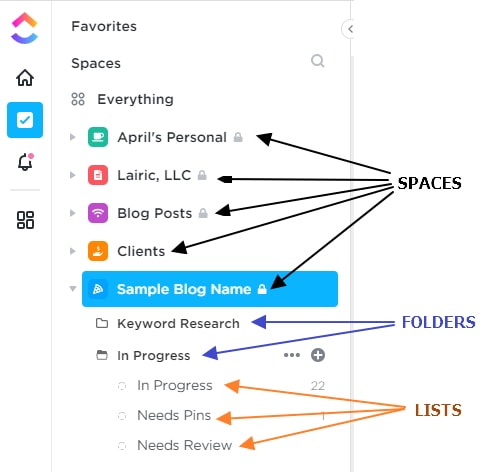
Each List can then have Tasks and tasks can have Subtasks.
Setting Up ClickUp for Blogging
Following is how I would setup ClickUp for blogging. Keep in mind that you can tweak the system to fit your workflow style. This is just one idea but you can customize it and make it your own!
If you are a more visual person, check out this video first. This post will cover most of what is in it. Also, if you view the video on YouTube you can use time codes in the description to jump to footage of specific parts in the process.

Create Your Space
To get started, create a space for your blog. I recommend using your blogs name for that space.
- Set a color
- Set an icon
Create Your Folders
I recommend three different folders. Each folder will have a few different lists.
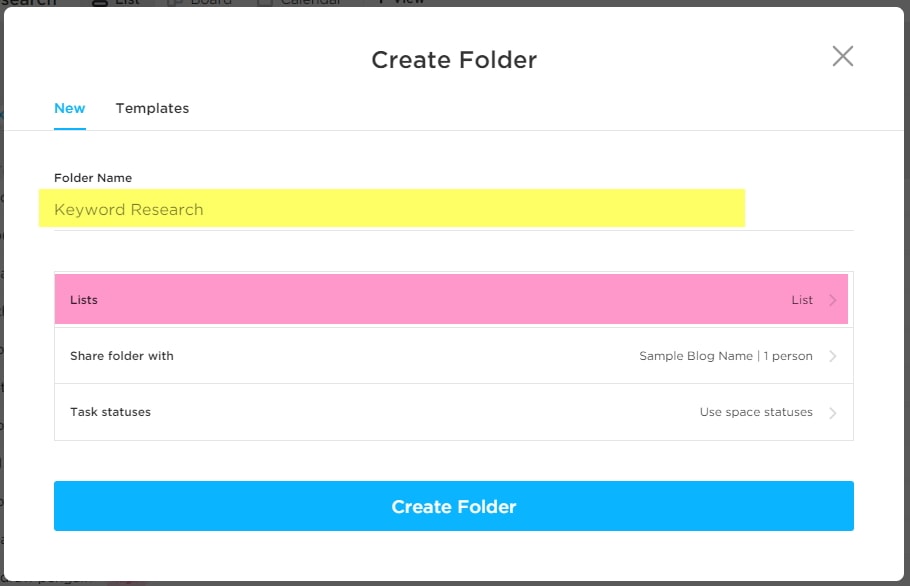
Give your folder a name (Yellow). At this point you can setup your lists now (pink) or you can do it after the fact. Both ways work fine but in order to try and keep this post organized we’ll set them up last.
The folders I recommend creating are:
- Keyword Research
- In Progress
- Admin / Housekeeping
You can add more folders as you go along but I feel like this folder set provides a good initial structure.
Create Your Lists
Each folder can have one or more lists. I find this helpful to organize ideas. Here’s how I set it up in the tutorial.
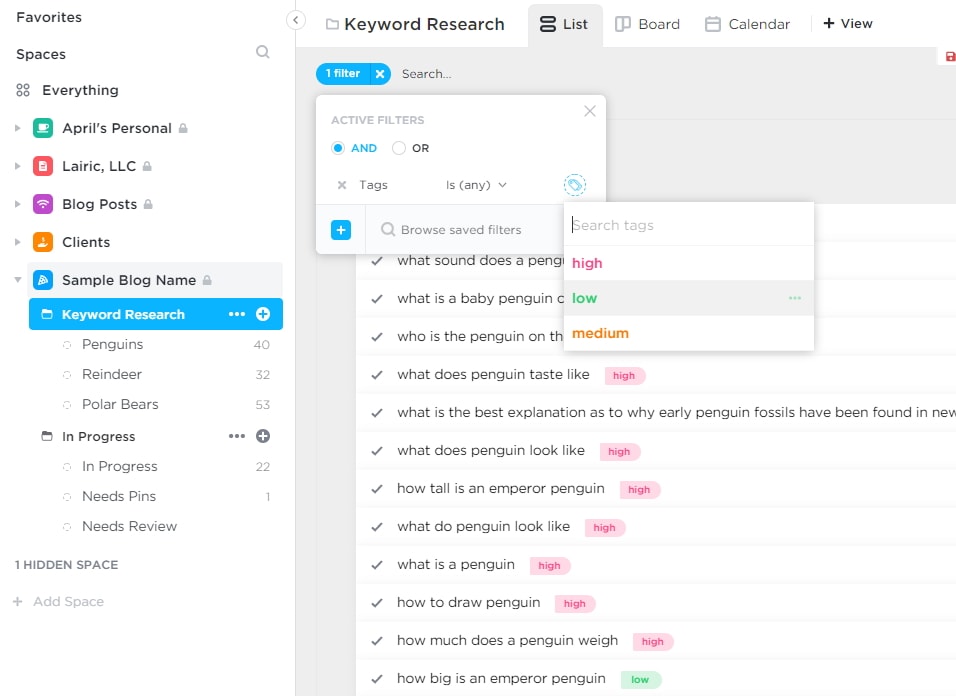
For the first folder, “Keyword Research”, I find it helpful to organize my research by category. For each of my blogs I have several “categories” of post topics I’ll cover. In this example, our blog is Animals in the Snow. So under that folder I’ll create three Lists with the category names like this:
Keyword Research
- Penguins (Category 1)
- Reindeer (Category 2)
- Polar Bears (Category 3)
Next, I’ll add some lists to the In Progress folder. These lists are:
- In Progress
- Needs Pins
- Needs Review
These lists are determined based on my own blogging workflow. If we assume each “task” is ONE post.
- Once I decide to write a keyword, it is moved to “In Progress”. There it will go through a variety of different statuses.
- Once the blog post has been published, the post needs to have pins created for it so I move it to the “Needs Pins” list.
- Once all the pins have been made and scheduled, I move the post to the “Needs Review” section where it will sit for 12 months or so until I review it.
Because I batch create and then schedule pins, this process works well for me. If you manually pin, you could certainly alter it to fit your goals there as well.
Defining Statuses for Each List
With my setup, each list has it’s own custom statuses. That way, at any point in time I can see where my posts are in the grand scheme of thing. Color coding is also very important for my setup as it allows me to quickly see tasks that are not complete.
The statuses (and recommended colors) for each list are as follows:
Keyword Research
For this folder, each list just has the basic statuses of To Do and Complete.
- To Do (gray)
- Complete (green)
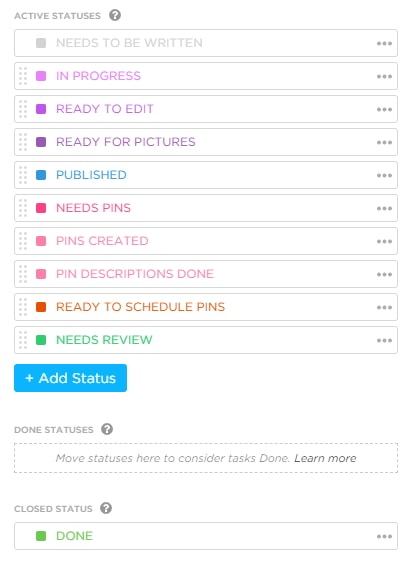
In Progress (List)
- Needs to be Written (gray)
- In Progress (purple)
- Ready to Edit (red)
- Ready for Pictures (orange)
- Published (green)
Needs Pins
- To Do (bright pink)
- Pins Created (light pink)
- Pin Descriptions Done (blue)
- Pins Scheduled (green)
Needs Review
- To Do (dark blue)
- Done (green)
As far as colors, use whatever makes you happy. The key is that you can quickly distinguish stages based on the color of the task. That becomes important if you use the calendar view and less important if you prefer a board or Kanban style view.
Filling the Content Calendar
At the start of each month I like to plan out my content calendar for the month. I do this by actually setting the date each topic will be published.
Because our keyword list might have hundreds or thousands of ideas on it. The first thing I do is filter the list to show the posts for which I think I’ll have the best chance of ranking. In this case, I have used tags to identify competition for the keyword as low, medium or high so I’ll filter the list to show just the “low” items.
Note: You could use custom fields to show more information about each keyword. I will include that on a later tutorial but left it off of this one because custom fields has a 100 use limitation on the FREE ClickUp plan.
Once you do that you’ll be able to select however many posts you want to write the following month and move them all over to “In Progress”. If you have the folder selected, you’ll be able to see all the keywords across all of your categories. You can easily select multiple and move them all over at once. ClickUp will even show you how many you have currently selected.
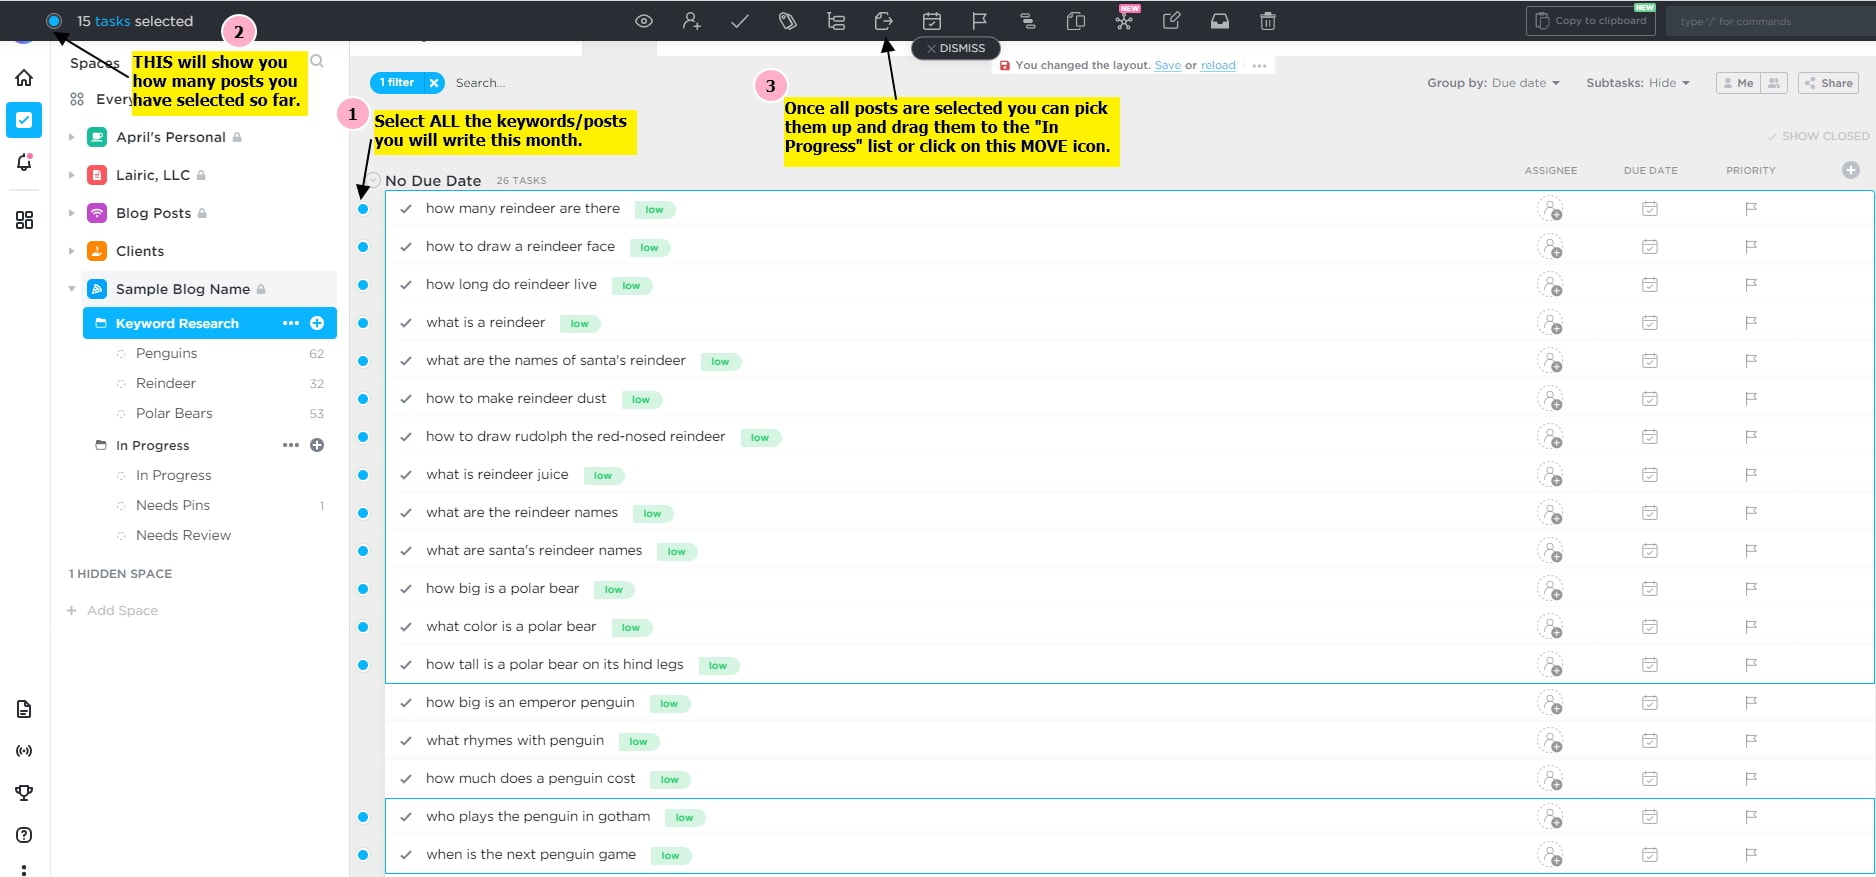
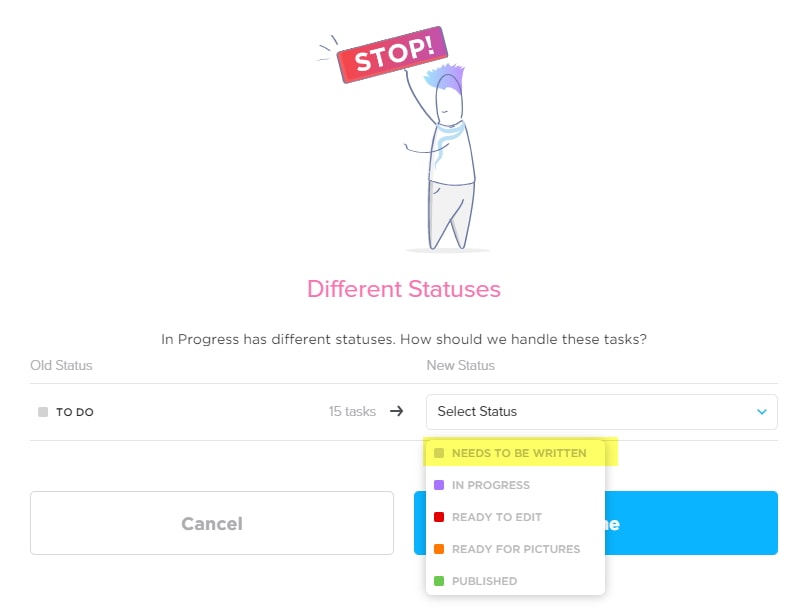
Move the tasks over by either dragging them onto the “In Progress” list. You can also use the move icon to move them. The system should prompt you for a status. Right now, set them all to “Needs to be Written”.
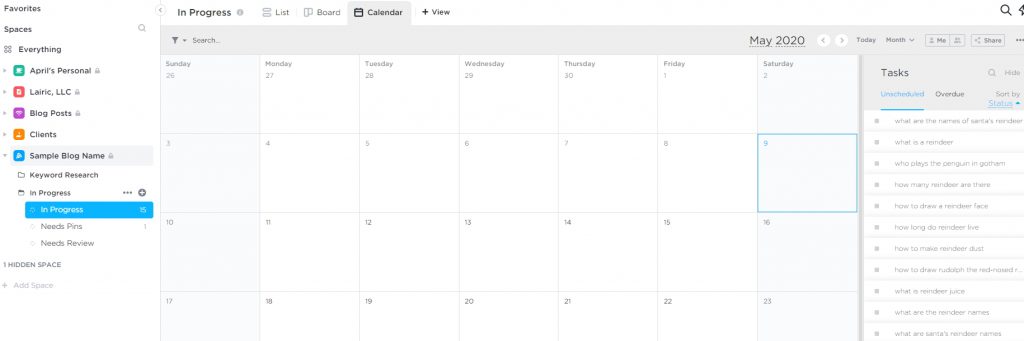
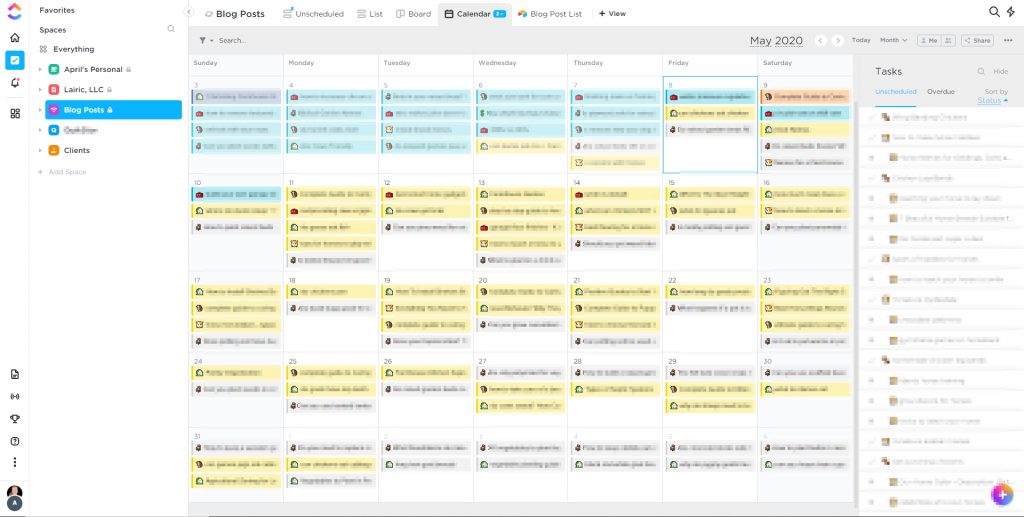
Now comes the fun part. The actual scheduling of the blog content. Click on your “In Progress” folder and then switch to the Calendar view at the top. Here you will see a blank calendar and, on the right, a list of all of your Unscheduled tasks (blog posts).
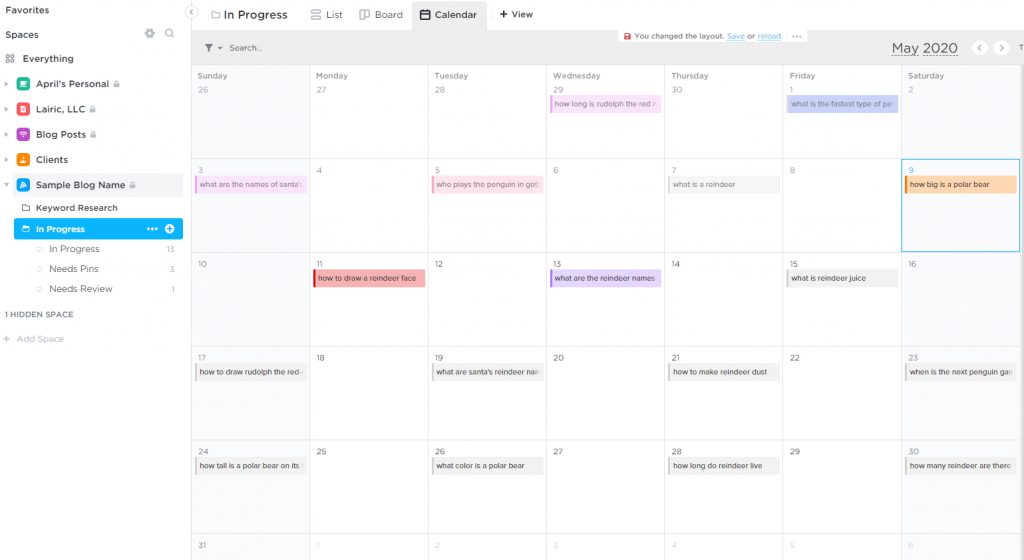
Simply pick up a post and drag it over to the date you want to publish it. It’s that easy! Rinse and repeat until all of your blog posts are scheduled.
As you work on blog posts, update their status to reflect your progress. You’ll get to know your colors the more you use the system. You can use whichever view suits your workflow best. I love working off of the list and calendar views but for some, especially those used to Trello, the board view might be more intuitive.
At any time, though, you can click on the In Progress folder and the Calendar view will show you very quickly all the tasks on all the lists.
The only thing it won’t do is show anything that is in a “Done” or completed status. Each week you could manually move your “published” posts into the “Needs Pins” folder, for example. In my case, I have automations setup to do this for me.
You could also just have ONE list for everything in the In Progress folder and then just set up a big list of statuses to move things through without needing automations. That would work just as well and would look something like this:
So there are definitely different ways of organizing the same data. It is all about finding a method that works for you. Because I use the calendar view so much, I don’t update due dates at all. The due date is always the date the post was published. My blog posts are never truly “done” or complete.
Once a post is published, it goes to the pins list. When I am ready to create pins I can go into that list and see what needs to be done without worrying about “overdue” tasks. Then, once the pins are scheduled the post goes into the “Needs Review” list where it sits for a year or so.
Final Thoughts
ClickUp is such a fun tool to use for productivity. For me, it makes getting things done fun. Because you can have different spaces and folders, it’s easy to organize the tasks from every area of your life to quickly see all of your To Do’s at a glance. Then, when you are ready to get to work, you can easily filter down to only what you need to do in that specific work session.
I use ClickUp to manage ALL of the blogs on this page. In case you are wondering what my content calendar looks like, here is a screenshot for this month. I have the colors to suit my liking. Since blue is my favorite color, that is my “needs pins” color. I also add a site icon in front of each post so I can quickly see which sites have posts going out on which days.
At some point I’ll do a post on my actual blog setup and workflow in ClickUp but it mostly mirrors what I have outlined above as far as statuses, but my folders and lists setup are quite a bit different to help me work with my team better. Automations also play a big role for helping to keep things moving for me.
If you want to check out another serial bloggers ClickUp workflow, check out Anne’s ClickUp post at YEYS.com.